2020年5月25日 星期一


2012年5月20日 星期日
python + shellcode 實測 64/32

最近看到Shellcode文章,手癢把它改相容64bit Ubuntu及32bit cygwin 了。
由此下載原始碼修改過smc.py
Ubuntu 11.10 (GNU/Linux 3.0.0-12-virtual x86_64)
使用Python 2.7.2+,進行測試
| Linux pylab 3.0.0-12-virtual #20-Ubuntu SMP Fri Oct 7 18:19:02 UTC 2011 x86_64 x86_64 x86_64 GNU/Linux # python smc.py linux2_add64(99, 1) = 100 |
Linux xubuntu 2.6.35-32-generic #65-Ubuntu SMP i686 GNU/Linux
使用Python 2.6.6,進行測試
| $ python smc.py linux2_add32(99, 1) = 100 |
Windows XP+cygwin+gcc(4.5.3) + python 2.7.2
使用dump_machine_code.sh, ASM 的結果:
| add.o: file format pe-i386 Disassembly of section .text: 00000000 <_add>: 0: 55 push %ebp 1: 89 e5 mov %esp,%ebp 3: 8b 45 0c mov 0xc(%ebp),%eax 6: 03 45 08 add 0x8(%ebp),%eax 9: 5d pop %ebp a: c3 ret b: 90 nop |
| $ python smc.py cygwin_add32(99, 1) = 100 |
載入平台相依的libc
if sys.platform == "cygwin":
libc = cdll.LoadLibrary("/bin/cygwin1.dll")
else:
libc = CDLL('libc.so.6')
判斷32或64位元的方法之一
| import sys from math import log def is64bit(): return log(sys.maxsize, 2) == 63 |
小結
這技巧可以使用smc主程式,隨意在執行時修改程式碼的方法,也提供一條路讓python直接與硬體溝通。
如這是一個24小時不能停機的程式,意味著筆者可利用這方法做出不需要重新執行python主程式來動態載入修改過的函式庫。
當然這種方法也會影響Python 跨平台的可攜性,
解決方法只能為各種所需執行平台編繹對應的版本(若其平台安裝有gcc,則可以在執行檢查有無對應的platform_func.o 檔案,動態產生並載入它,類似pyc的做法)。
2011年9月7日 星期三
Go 程式語言初探
from http://golang.org
最近寫多篇與OS開發相關超硬的文章,來學習Go 語言換換口味輕鬆一下吧!參考英文說明,寫了以下心得:
使用平台為Mac OS X 10.6.8 + Xcode 4.2
前言
Go 程式語言是一個開放源碼的專案,以BSD-style授權發佈。
它以通用語言作為系統設計基礎想法。在強調於型別、垃圾回收及明確定義支持Concurrent程式設計的語言功能等等。並提供大量套件 ,提高寫程式效率。目前支援x86及ARM處理器,一個64位元及32位元x86的編譯套件(6g和8g),及支援ARM的編譯套件(5g)。
開發環境設定
安裝 Mercurial (hg)
sudo easy_install mercurial(註:easy_install 是python所內附一個好用安裝第三方工具的python腳本)
Mercurial versions 1.7.x 需要設定檔來指定憑證授權 Certification Authorities (CAs). 在筆者機器遇到下列警示訊息:
warning: go.googlecode.com certificate with fingerprint 28:92:... not verified (check hostfingerprints or web.cacerts config setting)
這表示你所使用的Mercurial沒有正確設定CAs. 參考configure the CAs一文,進行設定。
以下是OSX 10.6以上版本的設定
openssl req -new -x509 -extensions v3_ca -keyout /dev/null -out dummycert.pem -days 3650
使用openssl命令建立替代憑證(設定內容隨意打)
接著使用下列指令將dummycert.pem複製到/etc
sudo cp dummycert.pem /etc/hg-dummy-cert.pem
最後在~/.hgrc 或go/.hg/hgrc內容加入下列兩行。
[web]
cacerts = /etc/hg-dummy-cert.pem
下載Go 正式發佈版本源碼
hg clone -u release https://go.googlecode.com/hg/ go
編譯Go
你將需要安裝Xcode,其中包含GCC, C libraries ...
$ cd go/src
$ ./all.bash
如果沒任何錯誤發生,訊息如下:
ALL TESTS PASSED

---
Installed Go for darwin/amd64 in /Users/you/go.
Installed commands in /Users/you/Go/bin.
*** You need to add /Users/you/Go/bin to your $PATH. ***
The compiler is 6g.
最後幾行顯示你的系統資訊,硬體架構,和所安裝的目錄,你需要將此目錄加到搜尋路徑中。詳請參閱英文文章環境變數environment variables.
使用Go來編譯Hello範例
| $ make 6g hello.go hello.go:2: can't find import: fmt |
錯誤發生原因沒有指定環境變數。
筆者指定下列環境變數後,總算編譯成功。
export PATH=~/Go/bin:$PATH
export GOROOT=$HOME/Go
export GOARCH=386
export GOOS=darwin
export GOBIN=$HOME/Go/bin
執行結果
hello 範例可由此下載。
歡迎留言分享心得。
筆者指定下列環境變數後,總算編譯成功。
export PATH=~/Go/bin:$PATH
export GOROOT=$HOME/Go
export GOARCH=386
export GOOS=darwin
export GOBIN=$HOME/Go/bin
| $ make 6g hello.go 6l -o hello hello.6 |
執行結果
| $ make run ./hello hello, world |
hello 範例可由此下載。
歡迎留言分享心得。
2011年9月5日 星期一
啟用e100 (i82559er)網路卡在自製Bos
 續上篇自製BenOS支援lspci 命令,參考MIT OSE Lab6: Network Driver 及其中各項文件,且參照相關Linux網路驅動程式設計,目前已整合實作82559er網路卡驅動至BOS v0.21中。
新增及修改下列檔案:
| pcireg.h | PCI相關參數標頭檔,引用自NetBSD,源自MIT OSE LAB |
| pci.c | 移植Lab6 kern/pci.c |
| net_e100.h | 參考Lab6相關實作資料 |
| net_e100.c | 參考Lab6相關實作資料 |
| qemu -fda "../bos.img" -net user -net nic,model=i82559er |
啟用e100
其中pci.c,如何啟用e100 82559er 簡略原始碼如下:
| pci_func_enable(pci_pdata_t f) { pci_conf_write(f, PCI_COMMAND_STATUS_REG, PCI_COMMAND_IO_ENABLE | PCI_COMMAND_MEM_ENABLE | PCI_COMMAND_MASTER_ENABLE); for (bar = PCI_MAPREG_START; bar < PCI_MAPREG_END; bar += bar_width) { uint32_t oldv = pci_conf_read(f, bar); bar_width = 4; pci_conf_write(f, bar, 0xffffffff); uint32_t rv = pci_conf_read(f, bar); if (rv == 0) continue; int regnum = PCI_MAPREG_NUM(bar); if (PCI_MAPREG_TYPE(rv) == PCI_MAPREG_TYPE_MEM) { if (PCI_MAPREG_MEM_TYPE(rv) == PCI_MAPREG_MEM_TYPE_64BIT) bar_width = 8; size = PCI_MAPREG_MEM_SIZE(rv); base = PCI_MAPREG_MEM_ADDR(oldv); } else { size = PCI_MAPREG_IO_SIZE(rv); base = PCI_MAPREG_IO_ADDR(oldv); } pci_conf_write(f, bar, oldv); f->addr_base[regnum] = base; f->addr_size[regnum] = size; } |
net_e100.c
啟用後,這時便用使用到 io region 1: 0xc040,長度為64位元組,參考Intel 82559,來進行下列操作。
需要將e100 做軟體重置(可參e100_reset函式),因使用DMA Rings,
所以接著要掛上傳送的緩衝區Control Block List(CBL)及接收用的緩衝區Receive Frame Area(RFA),可參考cbl_init()及rfa_init()。
net 命令
在起動Bos v0.21後,輸入net 指令,可看到下列結果:
| bos$ net PCI function 00:18.0 (8086:1209) enabled mem region 0: 4096 bytes at 0xf2020000 io region 1: 64 bytes at 0xc040 cbl avail = 9, wait = 1, slot = 0x420000, irq=11 rfa avail = 10, wait = 0, slot = 0x420050 |
結語
原使用e100設備序號,並不生效;後來研究OSE資料後,發現必須在qemu參數中設定,之後再使用設備序號1209來啟用e100(i82559er),如此才能正確執行在qemu環境。
MIT OSE Lab6十分具有挑戰性,筆者經幾天的努力才把這網路卡驅動部分實作完成;但大約只完成Lab6的三分之二,其餘部分,待9/6社群活動後,再來討論後面部分旳細節。本次程式碼可由此下載。
2011年8月25日 星期四
在Cygwin中設定並使用Qemu

在看完前三篇編繹BOS文章之後,眼尖的讀者,應該有發現在Linux和MAC OS X平台都是使用qemu 來執行;可是一到Windows 怎麼變成VMWare Player呢!其實筆者曾試著編繹cygwin版的qemu, 卻有太多問題要解決,為求效率;使用其他虛擬機軟體來代替。
這篇算是補完"自製開發BenOS支援Windows+Cygwin"一文。
1. 下載所需qemu工具
在使用谷歌大神後,Qemu.org的友站連結中的非官方版已預先編繹好的程式,找到qemu 0.13版,由此下載 。(感謝他的分享,筆者少花數小時生命。)
2. 安裝Qemu
在下載完qemu-0.13.0-windows.zip後,將它解壓縮到cygwin安裝目錄中。3. 開啟cygwin命令視窗
就筆者環境來說,路徑為C:\cygwin\usr\local\qemu
加入下列指令到 /etc/bash.bashrc
4. 重新開啟cygwin命令視窗
export PATH=/usr/local/qemu:$PATH
下載最新版bos,執行下列指令,便可看到如上所示執行畫面:
make run
本次在程式碼的編繹腳本修改所使用命令為qemu,主因是此版本qemu-system-x86_64.exe無法正常運作,但qemu卻是正常工作。結語
@@ -9,7 +9,7 @@ endif
all: run
run:
-ifeq ($(KNAME),CYGWIN)
+ifeq ($(KNAME),$(KNAME_CYGWIN))
qemu -fda "$(IMG_NAME)"
else
qemu-system-x86_64 -boot a -M $(MACHINE) -fda "$(IMG_NAME)"
筆者歸納了最近使編繹流程跨平台的經驗,列出幾點供大家參考:
- 先到網上花5分鐘找看看,有無編繹好的開發用軟體;
- 如果沒有,看看有無編繹經驗分享,
- 也無經驗分享,最後才是自己編繹一版。
當然這也筆者撰文的原因之一。
註:此次報名網址已建置好,請由此報名9/6星系主題活動。
更新0825
Dennis 有提出:
我覺得應該找qemu for win32, 用vc++或mingw compile。因為cygwin有些posix api模擬,並沒有做得很好,用native win32 api比較順。而且我很久以前有試過這個 http://www.h7.dion.ne.jp/~qemu-win/ ,它應該可以work。
ben 想:
不過這個qemu-win網址編繹的版本0.9.0有點老而且已停止更新,其實我文章中所用Qemu 可能同一人所維護,只是文中使用連結是較新的版本。若要最新版本,需要的人就要自行編繹了。
2011年8月21日 星期日
自製開發BenOS支援Windows+Cygwin


筆者便在想,讓自製的小系統也能直接在Windows 裡編繹並使用其虛擬機器執行。
1. 安裝Cygwin
(但Cygwin 所附的bash login console 介面,限制頗多,不太方便,所以下載mintty來使用 (它以putty程式碼修改而來)。
在安裝過程中,請記得選取並安裝gcc 和nasm套件,用來編繹主程式及組合語言部分。
2. 安裝mtools
在Bos v0.2後,使用了mcopy。可參考 英文原文或此文下載安裝。
3. 安裝 git + pagent.exe
因為要使用github,而其中需要使用上傳檔案的key,
所以利用pagent.exe 將key提供給git 使用。(試過使用ssh,但不能正常工作)
目前筆者在使用github 前,使用下列命令將key載入,
| bash file: load_pagent_with_key |
| /cygdrive/c/yourpath/pageant.exe "c:\\youpath\\your_key_generate_by_puttygen.ppk" & |
記得使用完github,要將下列PAgent 圖示,按滑鼠右鍵,選Exit結束程式。

4. 下載 BOS v0.2 原始碼
使用git 前,請確認GIT_SSH環境變數:
註:可在Windos 系統內容->進階->環境變數->系統變數 中修改GIT_SSH。
請下載最近原始碼
5. 編繹Bos
在編繹過程發現原本由CYGWIN所安裝的gcc 只支援PE 格式,所編繹出來的obj file 格式為 Windows coff @.@。
但main.s同時包含16位元與32位元程式碼用以進入32位元保護模式, 所以會產生下列錯誤。
目前編繹obj檔案格式參照
目前解決方法有二:
1. 改寫main.s 將進保護模式部分移到開機程式中,使其能順利使用 nasm –f win32 編繹。
2. 使用cross compiler, 參考OSDev.og文章GCC Cross Compiler
筆者選擇使用方法二,主因是BOS可能會支援ARM或其他平台。看了此篇Cross-Compiler Successful Builds。
使用binutils-2.20 + gcc-4.4.3 的組合,編繹了一版ToolChain,由此下載。
cygwin_toolchain4_bos0821.tgz (md5sum: e06bdccb2c44c4cc65097399e8722d95)
已修改使用新的Toolchain, 下列為編繹成功範例。
在windows 上使用VMware Player來執行, 請建立一新的虛擬機器,
在使用磁片檔部分填入所產生的bos.img 的檔案路徑及名稱,如下所示,
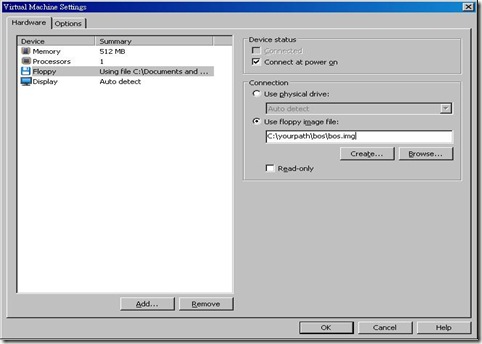
接著執行,便可看到本文開頭的執行畫面。
讀者們若對編繹及執行BOS系統在windows+cygwin上有任何問題?
另外筆者最近寫了許多新文章,這裡有個小問題,請問一下讀者們,有什麼想看的技術主題?
歡迎留言交流。
註:此次9/6活動已加入TOSSUG行程(請參閱http://www.tossug.org/2011)
使用git 前,請確認GIT_SSH環境變數:
| $ export | grep GIT declare -x GIT_SSH="C:\\yourpath\\plink.exe" |
請下載最近原始碼
| $ git clone git@github.com:benwei/bos.git Initialized empty Git repository in C:/src/ github/bos/.git/ remote: Counting objects: 65, done. remote: Compressing objects: 100% (58/58), done. remote: Total 65 (delta 5), reused 63 (delta 3) KiB/s Receiving objects: 100% (65/65), 32.73 KiB | 31 KiB/s, done. Resolving deltas: 100% (5/5), done. |
| $ make … ignored nasm -f elf32 kernel/main.s -o kernel/main.o -Iinclude/ # -l kernel/main.lst nasm -f elf32 kernel/osfunc.s -o kernel/osfunc.o -Iinclude/ # -l kernel/osfunc .lst ld -nostdlib -static -e _start --no-undefined -X -T ld-script.lds -Map MYOS.map -o myos.elf kernel/init.o kernel/kthread.o lib/describtbl.o lib/fifo.o lib/file. o lib/floppy.o lib/interrupt.o lib/keyboard.o lib/memory.o lib/mtask.o lib/timer .o blibc/screen.o blibc/stdio.o blibc/string.o apps/bshell.o kernel/main.o kerne l/osfunc.o ld: cannot perform PE operations on non PE output file 'myos.elf'. make: *** [myos.elf] Error 1 |
但main.s同時包含16位元與32位元程式碼用以進入32位元保護模式, 所以會產生下列錯誤。
| $ make CYGWIN=1 nasm -f win32 kernel/main.s -o kernel/main.o -Iinclude/ # -l kernel/main.lst begdt.inc:24: error: COFF format does not support non-32-bit relocations kernel/main.s:75: error: COFF format does not support non-32-bit relocations kernel/main.s:89: error: COFF format does not support non-32-bit relocations make: *** [kernel/main.o] Error 1 |
| $ file bos/kernel/init.o bos/kernel/init.o: MS Windows COFF Intel 80386 object file $ file bos/kernel/main.o bos/kernel/main.o: ELF 32-bit LSB relocatable, Intel 80386, version 1 (SYSV), not stripped |
1. 改寫main.s 將進保護模式部分移到開機程式中,使其能順利使用 nasm –f win32 編繹。
2. 使用cross compiler, 參考OSDev.og文章GCC Cross Compiler
筆者選擇使用方法二,主因是BOS可能會支援ARM或其他平台。看了此篇Cross-Compiler Successful Builds。
使用binutils-2.20 + gcc-4.4.3 的組合,編繹了一版ToolChain,由此下載。
cygwin_toolchain4_bos0821.tgz (md5sum: e06bdccb2c44c4cc65097399e8722d95)
| $ cd / $ tar zxvf <your download path>/cygwin_toolchain4_bos0821.tgz |
| $ make nasm -o bootldr.elf boot/bootldr.s -I include nasm -f elf32 kernel/main.s -o kernel/main.o -Iinclude/ # -l kernel/main.lst nasm -f elf32 kernel/osfunc.s -o kernel/osfunc.o -Iinclude/ # -l kernel/osfun .lst building [kernel/init.c] -> [kernel/init.o] building [kernel/kthread.c] -> [kernel/kthread.o] building [lib/describtbl.c] -> [lib/describtbl.o] building [lib/fifo.c] -> [lib/fifo.o] building [lib/file.c] -> [lib/file.o] building [lib/floppy.c] -> [lib/floppy.o] building [lib/interrupt.c] -> [lib/interrupt.o] building [lib/keyboard.c] -> [lib/keyboard.o] building [lib/memory.c] -> [lib/memory.o] building [lib/mtask.c] -> [lib/mtask.o] building [lib/timer.c] -> [lib/timer.o] building [blibc/screen.c] -> [blibc/screen.o] building [blibc/stdio.c] -> [blibc/stdio.o] building [blibc/string.c] -> [blibc/string.o] building [apps/bshell.c] -> [apps/bshell.o] /usr/local/cross/bin/i586-elf-ld -nostdlib -static -e _start -s -Ttext 500 -Map MYOS.map -o myos.elf kernel/main.o kernel/osfunc.o kernel/init.o kernel/kthrea .o lib/describtbl.o lib/fifo.o lib/file.o lib/floppy.o lib/interrupt.o lib/keyb ard.o lib/memory.o lib/mtask.o lib/timer.o blibc/screen.o blibc/stdio.o blibc/s ring.o apps/bshell.o echo "convert myos.elf MYOS.BIN" convert myos.elf MYOS.BIN /usr/local/cross/bin/i586-elf-objcopy -I elf32-i386 -O binary -R .pdr -R .note R .note.gnu.build-id -R .comment -S myos.elf MYOS.BIN $ make package dd if=./bootldr.elf of=bos.img seek=0 count=1 1+0 records in 1+0 records out 512 bytes (512 B) copied, 0.000172887 s, 3.0 MB/s dd if=/dev/zero of="bos.img" seek=1 count=2879 2879+0 records in 2879+0 records out 1474048 bytes (1.5 MB) copied, 0.011148 s, 132 MB/s mcopy -i "bos.img" "MYOS.BIN" :: mdir -i "bos.img" Volume in drive : has no label Volume Serial Number is A0A1-A2A3 Directory for ::/ MYOS BIN 19576 2011-08-21 21:07 1 file 19 576 bytes 1 437 696 bytes free |
在使用磁片檔部分填入所產生的bos.img 的檔案路徑及名稱,如下所示,

接著執行,便可看到本文開頭的執行畫面。
讀者們若對編繹及執行BOS系統在windows+cygwin上有任何問題?
另外筆者最近寫了許多新文章,這裡有個小問題,請問一下讀者們,有什麼想看的技術主題?
歡迎留言交流。
註:此次9/6活動已加入TOSSUG行程(請參閱http://www.tossug.org/2011)
2011年8月13日 星期六
使用Python 直接載入 C 函式庫進行多平台測試

(圖示為Python.org 版權所有)
最近有個朋友聊起TDD (Test Driven Programming) 測試導向程式設計,測試導向的優點:
便是能減少重覆測試所需要人工測試時間,當網友若修改程式庫時,
敢對進行程式優化,也較對修改有把握,因為可利用自動測試的程式來立刻驗證。
他最常使用C來寫程式,但是使用C來寫測試函式,就算附加CPPUnit 之類,還是需要比較多時間實作。
所以筆者寫了本篇心得,使用Python 來直接對C函式庫進行測試。
本次範例包括下列:
檔案名稱 | 說明 |
| test.c | 編繹為函式庫libtest.so或libtest.dll |
| main.c | 編譯連結測試main() |
| main.py | 用來載入測試函式庫的python 腳本檔 |
| Makefile | 執行編譯及測試 |
test.c
| #include <stdio.h> #define UBOUND 10 // 上限 #define LBOUND 1 // 下限 int foo(int r) { if (r > UBOUND) return UBOUND; if (r < LBOUND) return LBOUND; printf("foo(%d) executed.", r); return r; } |
main.py部分程式範例:
此腳本主要使用cdll.LoadLibrary來載入所要進行測試函式庫
| from ctypes import * foolib = cdll.LoadLibrary(libname) |
接著使用下列函式來驗查超出上限、下限及正常值。
(註:為求易懂並無使用其他測試函式庫。網友們可在網上找尋到許多python 測試函式庫,來縮短開發時程。)
| def verify_lbound(): p = 0 r = foolib.foo(p) return verify_ifeq(1, r, p,"case lbound") def verify_ubound(): p = 11 r = foolib.foo(p) return verify_ifeq(10, r, p, "case ubound") def verify_general(): p = 5 r = foolib.foo(p) return verify_ifeq(p, r, p, "case general") |
多平台編繹測試
在Makefile中,我們可使用uname –s 來取得使用平台的資訊,
再利用 ifeq 來實作平台不同的部分,以本次的範例而言,
平台編繹的主要在windows 使用函式庫名為.dll及執行程式副檔名為.exe,
而在Linux或Mac中,函式庫名要前綴lib,後置.so,可參考下方框紅色部分
| KNAMEFULL = $(shell uname -s | sed 's/_.*//g') # cygwin on windows xp # CYGWIN_NT-5.1 KNAME = $(KNAMEFULL) ifeq ($(KNAME),CYGWIN) EXEEXT = .exe DLLEXT = .dll else EXEEXT = DLLEXT = .so endif |
編繹並執行測試:
Makefile檔案在 all: 加上 run,以用表示編繹 foo$(EXEEXT),
然後,從run程式段來看,在Linux或Mac中, export LD_LIBRARY_PATH=.
來通知載入程式,函式庫在目前目錄中。
緊接著,執行 foo$(EXEEXT) ,驗證二進位連結無誤,
再執行python 腳本測試,如有任何錯誤產生,顯示make失敗錯誤。
| all: run … run: foo$(EXEEXT) @ export LD_LIBRARY_PATH=.; ./$^ ; \ if [ $$? -eq 3 ]; then \ echo "Binary linking passed" ; \ python main.py $(LIBNAME)$(DLLEXT) ; \ if [ $$? -ne 0 ] ; then \ exit 1; \ fi \ else \ echo "Binary link failed" ; \ fi |
測試結果:
| $ make cc -c -o main.o main.c -Wall cc -c -o test.o test.c -Wall cc -o libtest.so -shared test.o cc -o foo main.o -ltest -L. foo(3) executed.Binary linking passed case ubound:verified return value(10) from test.foo(11) [Passed] case lbound:verified return value(1) from test.foo(0) [Passed] foo(5) executed.case general:verified return value(5) from test.foo(5) [Passed] total/passed cases: 3/3 Python load libtest.so [Passed] |
下列平台經過測試無誤:
- Ubuntu 10.10: Python 2.6.6
- Win XP SP3: CYGWIN_NT-5.1 + Python 2.6.5
- Snowleopard 10.6.8: Xcode4.0.2+Python 2.6.1
本次所有範例可從源碼GitHub使用git下載,歡迎交流經驗或提供建議。
訂閱:
文章 (Atom)