2011年11月30日 星期三

django i18n 實戰 (二)


續上篇django i18n 實戰,筆者作了一些小實驗,以方便中文翻譯的進行。

整段文章中文化


在前篇提到的使用django.po 來編修翻譯的方法,在此處便不太適用。
因為這類文字時常修修補補,非常不易維護。
目前使用的解決方法,使用不同locale目錄來放置不同語言版本template。
en test.html
test2.html
zh-tw test.html
test2.html

取得目錄及template名稱
from django.utils import translation
def getLocaleResourcePathName(templateName):
    cur_language = None
    try:
        cur_language = translation.get_language()
    except:
        logger.exception('getLocaleResourcePath')
    if cur_language == 'zh-tw':
        return "%s/%s" % (cur_language, templateName)
    return “en/%s”  % templateName
其中translate.get_language() ,傳會目前要求取用此頁瀏灠器所使用的語系。


在javascript中需翻譯的文字

解法1: 為將瀏灠器目前所使用的語系,存入cookie中,以便javascript實作中文化。
def setLangCookie(request):
    params = {}
    c = Context(params)
    t = loader.get_template(pageForJS)
    response = HttpResponse(t.render( c ))
    try:
        cur_language = translation.get_language()
        response.set_cookie('lang', cur_language)
    except:
        logger.exception('set_cookie')
    return response

解法2: 同上一解法為將所需要翻譯文字集中至同一檔案,依瀏灠器目前所使用的語系,代換為i18n.js所在路徑。

簡易bash腳本檔案i18n.sh


續前篇,將相關命令包裝為腳本檔以方便使用。

如: sh  i18n.sh  u
 (即更新django.po檔案,附加新增文字)

#!/bin/sh


ACTION="$1"
TARGET="$2"

usage() {
        echo "syntax: |update|compile>"
}

case $ACTION in
initial)
        django-admin.py makemessages -l zh_TW "$TARGET"
        ret=$?
;;
u*|update)
        django-admin.py makemessages -a
        ret=$?
;;
c*|compile)
        django-admin.py compilemessages
        ret=$?
;;
*)
        usage
        ret=1
;;
esac
exit $ret

備註:其中django-admin.py,如使用環境在Mac OS X 使用brew install gettext卻找不到xgettext 和 msgfmt相關檔案時,請使用下列命令產生正確連結:
 brew link gettext


2011年11月29日 星期二

django i18n 實戰

image

最近在為的上線前專案做中文化的處理,在此留下一心得記錄。
就django 中文化相關工具而言,主要是將gettext中的兩個命令:
  • xgettext包裝成django-admin.py makemessages, 用以將程式及腳本檔中所定義的Key字串取出放入至django.po
  • msgfmt包裝成django-admin.py compilemessages, 用來把django.po 轉為二進位的django.mo檔案。
Key 字串
以底線(_)為常見的gettext key字串
在下列命令為常使用的兩種:
from django.utils.translation import gettext_lazy as _
筆者使用下列語法:
from django.utils.translation import ugettext as _
為什麼筆者不使用 gettext_lazy呢?
django 在更新po檔案時,會將相近字詞直接複製到附加的詞組中,時常牛頭不對馬嘴,不如手動編修。

demo 專案為例
請進入與settings.py同層的專案目錄
$ django-admin.py makemessages –l zh_TW
processing language zh_TW
正確產生自動下列檔案django.po
locale/zh_TW/LC_MESSAGES/django.po
如出現下列錯誤:
$ django-admin.py makemessages -l zh_TW
Error: This script should be run from the Django SVN tree or your project or app tree. If you did indeed run it from the SVN checkout or your project or application, maybe you are just missing the conf/locale (in the django tree) or locale (for project and application) directory? It is not created automatically, you have to create it by hand if you want to enable i18n for your project or application.
請建立locale目錄,再試一次。

更新po檔案
每當新增一些個需要中文化字串,並不需要將它們動手加入django.po
可使用下列指令,直接將新字串附加至原有的django.po:
$ django-admin.py makemessages –a
編譯mo
$ django-admin.py compilemessages
註:在測試時,如有重新mo檔案,請重新執行django。

附錄
  • 在使用 blocktrans 及 endblocktrans時,因為採用python 內建dict 變數代換功能,所以只能使用-層。範例如下:
{% blocktrans %} {{user.username}} 進行統
統操作中,… {% endblocktrans %}
其中 {{user.username}}將無法正確代換,需改為 {{username}} 一層dict 結構。對照python 原字串展開範例:
userinfo={'username': _('Bill')}
"%(user.username)s 進行統
統操作中,…" % userinfo


結論


gettext 廣泛使用在開源軟體之中,而django-admin加以包裝,讓它在使用上更加方便。
若對如何包裝gettext有興趣,可參閱python腳本檔如下:
/usr/lib/python2.7/site-packages/django/core/management/commands/makemessages.py
/usr/lib/python2.7/site-packages/django/core/management/commands/compilemessages.py

2011年11月3日 星期四

Vagrant+virtualbox (2): 實戰封裝自制package.box

image

續上篇執行lucid32.box 使用 jRuby + vagrant在Windows XP
Vagrantfile 範例
Vagrant::Config.run do |config|
  config.vm.box = "gold"
  # config.vm.forward_port("web", 80, 8080)
end


添加所需應用程式及設定,如安裝django套件:
sudo easy_install pip
sudo pip install django
使用此檔案執行 vagrant up後,使用 putty (參考執行lucid32.box 使用 jRuby + vagrant在Windows XP


若要附加自己的說明檔案,請使用—include
vagrant package --vagrantfile .vagrant --include README.txt


若要附加自己的說明檔案,請使用--
vagrant package --vagrantfile .vagrant --


執行結果
C:\Documents and Settings\vagrant\SRC\vagrant\gold>vagrant package --vagrantfile .vagrant --
[default] Attempting graceful shutdown of linux...
[default] Clearing any previously set forwarded ports...
[default] Cleaning previously set shared folders...
[default] Creating temporary directory for export...
[default] Exporting VM...
Progress: 0%Progress: 1%Progress: 4%Progress: 9%Progress: 10%Progress: 14%Progre
ss: 19%Progress: 24%Progress: 28%Progress: 34%Progress: 39%Progress: 42%Progress
: 44%Progress: 49%Progress: 54%Progress: 69%
[default] Compressing package to: C:/Documents and Settings/vagrant/SRC/vagrant/gold/package.box[default] Packaging additional file: .vagrant


加入本機檔案package.box 為mygold box
vagrant box add mygold package.box


執行結果
C:\Documents and Settings\vagrant\SRC\vagrant\gold>vagrant box add mygold package.box[vagrant] Downloading with Vagrant::Downloaders::File...
[vagrant] Copying box to temporary location...
[vagrant] Extracting box...
[vagrant] Verifying box...
[vagrant] Cleaning up downloaded box...

在新增之後,看看目前有的boxes:
C:\Documents and Settings\vagrant\SRC\vagrant\mygold>vagrant box list
gold
lucid32
mygold


修改新的Vagrantfile 來使用 mygold
Vagrant::Config.run do |config|
  config.vm.box = "mygold"
  # config.vm.forward_port("web", 80, 8080)
end

執行vagrant up 啟動
C:\Documents and Settings\vagrant\SRC\vagrant\mygold>vagrant up
There is a syntax error in the following Vagrantfile. The syntax error
message is reproduced below for convenience:
C:/Documents and Settings/vagrant/.vagrant.d/boxes/mygold/include/_Vagrantfile:1: syntax error, unexpected ':'
{"active":{"default":"f5a2c996-a70b-4c2c-8928-a85127a26863"}}

發生錯誤,移除include/_Vagrantfile ,再執行一次,啟動成功。
C:\Documents and Settings\vagrant\SRC\vagrant\mygold>vagrant up
[default] Importing base box 'mygold'...
[default] The guest additions on this VM do not match the install version of
VirtualBox! This may cause things such as forwarded ports, shared
folders, and more to not work properly. If any of those things fail on
this machine, please update the guest additions and repackage the
box.
Guest Additions Version: 4.1.2
VirtualBox Version: 4.1.4
[default] Matching MAC address for NAT networking...
[default] Clearing any previously set forwarded ports...
[default] Forwarding ports...
[default] -- ssh: 22 => 2222 (adapter 1)
[default] Creating shared folders metadata...
[default] Running any VM customizations...
[default] Booting VM...
[default] Waiting for VM to boot. This can take a few minutes.
[default] VM booted and ready for use!
[default] Mounting shared folders...
[default] -- v-root: /vagrant
C:\Documents and Settings\vagrant\SRC\vagrant\mygold>vagrant ssh
`vagrant ssh` isn't available on the Windows platform. The
vagrant.ppk file for use with Putty is available at:
  C:/jruby-1.6.5/lib/ruby/gems/1.8/gems/vagrant-0.8.7/keys/vagrant.ppk
To use this create a new Putty session for `vagrant@localhost`
on port `2222`, in the Connection>SSH>Auth
configuration section navigate to the vagrant.ppk file,
select it, save the session for later use, and connect.
For a more detailed guide please consult:
http://vagrantup.com/docs/getting-started/setup/windows.html
C:\Documents and Settings\vagrant\SRC\vagrant\mygold>

使用 putty連入,檢查之前在gold box所產生的測試用檔案[my.box],OK。
image


停止啟動mygold box

vagrant halt


刪除啟動後的mygold box
C:\Documents and Settings\vagrant\SRC\vagrant\mygold>vagrant destroy
[default] Forcing shutdown of VM...
[default] Destroying VM and associated drives...


結論
利用封裝已安裝及設定好的軟體的Box,可大大減少啟動後所需的安裝時間。
且可使用不同版本的gold box 來進行軟體自動化測試,並方便管理。


附註
多人共用mygold.box
可將編寫腳本檔案 mygold_update.bat 中加入如下設定:
@echo off
REM 刪除已存在的mygold_xxxx, 視情況決定是否執行destory, 或由使用者自行決定
vagrant destroy
REM 移除舊的mygold
vagrant box remove mygold
REM 加入新的mygold
vagrant box add mygold http://yourwebserver:port/mygold.box
註:請記得將所產生的package.box檔案更改並放到自行架設的web server 上。

可與ssh 搭配使用
vagrant ssh 等於
ssh -i <vagrant private key> vagrant@localhost –p <vagrant port>
(ex: ssh -i /cygdrive/c/jruby-1.6.5/lib/ruby/gems/1.8/gems/vagrant-0.8.7/keys/vagrant vagrant@localhost -p 2222)

下列為使用cygwin + ssh + vagrant key
$ ssh -i /cygdrive/c/jruby-1.6.5/lib/ruby/gems/1.8/gems/vagrant-0.8.7/keys/vagrant vagrant@localhost -p 2222
Could not create directory '/home/vagrant/.ssh'.
The authenticity of host '[localhost]:2222 ([127.0.0.1]:2222)' can't be established.
ECDSA key fingerprint is 36:28:64:97:6c:a4:dd:2a:4e:1a:0e:db:3a:db:d4:66.
Are you sure you want to continue connecting (yes/no)? yes
Failed to add the host to the list of known hosts (/home/vagrant/.ssh/known_hosts).
Welcome to Ubuntu 11.04 (GNU/Linux 2.6.38-8-server x86_64)
* Documentation:  http://www.ubuntu.com/server/doc
  System information as of Thu Nov  3 01:22:58 CST 2011
  System load:  0.0               Processes:           71
  Usage of /:   3.1% of 38.15GB   Users logged in:     0
  Memory usage: 6%                IP address for eth0: 10.0.2.15
  Swap usage:   0%
  Graph this data and manage this system at https://landscape.canonical.com/
New release 'oneiric' available.
Run 'do-release-upgrade' to upgrade to it.
Last login: Thu Nov  3 00:49:19 2011 from 10.0.2.2
vagrant@vagrant-ubuntu-natty:~$

2011年10月31日 星期一

Python+Django 輕鬆寫Web AP


近期工作需要在較短時間內,開發出Web端的程式,因筆者擅長Python,最後決定使用python+django 的組合。
另外在FreeNas 8 中也是使用 python+django來實作Web 控制介面,所以學會django,也可日後若為FreeNas添加新功能做準備。

(註:Google App Engine也採用django,但內建的版本已封裝一層,但有網上教學如何使用原來的django套件方法。)

環境設定

本次採用python 2.7+django 1.3.1
django 授權BSD License(筆者愛用BSD授權)

Cygwin
  • 下載python-2.7.2 重新編繹
  • 開啟Cygwin Terminal 或Mintty for Cygwin
  • 安裝pip
    • easy_install pip
  • 使用pip來管理python套件
    • pip install django

Mac OS X Lion
  • 內建python 2.7.1
  • 開啟Terminal
  • 安裝pip
    • sudo easy_install pip
  • 使用pip來管理python套件
    • sudo pip install django

如何建立專案?

此部分主要參考django文件(原文),加入筆者心得
Django首次使用產生主網站(如:mystie)

django-admin.py startproject mysite

註:在Mac OS X使用django-admin.py startproject 如出permission denied, 請將修改權限

chmod +x django-admin.py

mysite 目錄結構
manage.pydjango命令列工具
settings.pydjango專案設定腳本
urls.py用來設定urls 對應網頁進入點(可參原文說明
__init__.py空的內容則用來告訴python這是一個module,並可用來指定mysite模組初始化動作


啟動mystie專案

若只要本機內可供取用,請執行下行命令(server 會啟動在127.0.0.1:8000)
python manage.py runserver

參數語法
python manage.py runserver [:]

若欲使外部可連接請指定IP為0.0.0.0,表所有外部電腦均可使用此server系統IP連接。
python manage.py runserver 0.0.0.0:8080

註:不可單獨指定IP而沒有指定port
$ python manage.py runserver 0.0.0.0
Error: "0.0.0.0" is not a valid port number or address:port pair.


執行結果
~ mysite$ python manage.py runserver 0.0.0.0:8080
Validating models...

0 errors found
Django version 1.3.1, using settings 'mysite.settings'
Development server is running at http://0.0.0.0:8080/
Quit the server with CONTROL-C.


使用瀏覽器連接到localhost:8080


結論

與之前試過nodejs+express,有異曲同工之妙;只在使用的語言不同。
若網友想寫類似Web應用程式,可選擇慣用,產能倍增。
除此之外,便是主機代管服務的選擇,也將會影響你的可用的組合。
因筆者較熟悉python,用django較為得心應手,而nodejs 到處使用callback的方式不太習慣。
最近django網站首頁所列一句話:
"Django makes it easier to build better Web apps more quickly and with less code."
也是筆者採用的主因之一。
本篇旨在記錄一下,學習心得,歡迎交流。


2011年10月30日 星期日

執行lucid32.box 使用 jRuby + vagrant在Windows XP

image

最近朋友有在Windows環境中使用vagrant的需求,
而筆者有時要用windows xp來使用vagrant,
故寫了本篇,便是介紹如何安裝vagrant及其環境。

安裝 Ruby
  • 實驗使用cygwin+ruby,但最後有相容性臭蟲問題而成殘念。
/usr/lib/ruby/gems/1.8/gems/virtualbox-0.9.2/lib/virtualbox/com/mscom_interface.rb:28:in `initialize': failed to create WIN32OLE object from `VirtualBox.VirtualBox' (WIN32OLERuntimeError)
    HRESULT error code:0x80004005
C:\Documents and Settings\vagrant>set PATH=C:\jruby-1.6.5\bin;%PATH%
C:\Documents and Settings\vagrant>gem install vagrant
Fetching: archive-tar-minitar-0.5.2.gem (100%)
Fetching: erubis-2.7.0.gem (100%)
Fetching: json-1.5.4-java.gem (100%)
Fetching: net-ssh-2.1.4.gem (100%)
Fetching: net-scp-1.0.4.gem (100%)
Fetching: i18n-0.6.0.gem (100%)
Fetching: thor-0.14.6.gem (100%)
Fetching: ffi-1.0.10-java.gem (100%)
Fetching: virtualbox-0.9.2.gem (100%)
Fetching: vagrant-0.8.7.gem (100%)
Successfully installed archive-tar-minitar-0.5.2
Successfully installed erubis-2.7.0
Successfully installed json-1.5.4-java
Successfully installed net-ssh-2.1.4
Successfully installed net-scp-1.0.4
Successfully installed i18n-0.6.0
Successfully installed thor-0.14.6
Successfully installed ffi-1.0.10-java
Successfully installed virtualbox-0.9.2
Successfully installed vagrant-0.8.7
10 gems installed
C:\Documents and Settings\vagrant>cd SRC
C:\Documents and Settings\vagrant\SRC>cd vagrantTest
C:\Documents and Settings\vagrant\SRC\vagrantTest>vagrant up
JRuby limited openssl loaded. http://jruby.org/openssl
gem install jruby-openssl for full support.
[default] Importing base box 'lucid32'...
[default] The guest additions on this VM do not match the install version of
VirtualBox! This may cause things such as forwarded ports, shared
folders, and more to not work properly. If any of those things fail on
this machine, please update the guest additions and repackage the
box.
Guest Additions Version: 4.1.0
VirtualBox Version: 4.1.4
[default] Matching MAC address for NAT networking...
[default] Clearing any previously set forwarded ports...
[default] Forwarding ports...
[default] -- ssh: 22 => 2222 (adapter 1)
[default] -- web: 80 => 8080 (adapter 1)
[default] Creating shared folders metadata...
[default] Running any VM customizations...
[default] Booting VM...
[default] Waiting for VM to boot. This can take a few minutes.
[default] Forcing shutdown of VM...
[default] Destroying VM and associated drives...
[default] Destroying unused networking interface...
LoadError: OpenSSL::BN requires the jruby-openssl gem
出現OpenSSL錯誤,在安裝下表的jruby-openssl後,此問題已排除。
C:\Documents and Settings\vagrant\SRC\vagrantTest>gem install jruby-openssl
Fetching: bouncy-castle-java-1.5.0146.1.gem (100%)
Fetching: jruby-openssl-0.7.4.gem (100%)
Successfully installed bouncy-castle-java-1.5.0146.1
Successfully installed jruby-openssl-0.7.4
2 gems installed

啟動lucid32版本
此版本由http://files.vagrantup.com/lucid32.box下載:
(使用vagrant add lucid32 下載,
便已發生無法正在驗證的問題,
筆者直接將box檔案用tar xvf lucid32.box解壓縮至.vagrant.d\boxes\lucid32\目錄中)
C:\Documents and Settings\vagrant\SRC\vagrantTest>vagrant up
[default] Importing base box 'lucid32'...
[default] The guest additions on this VM do not match the install version of
VirtualBox! This may cause things such as forwarded ports, shared
folders, and more to not work properly. If any of those things fail on
this machine, please update the guest additions and repackage the
box.
Guest Additions Version: 4.1.0
VirtualBox Version: 4.1.4
[default] Matching MAC address for NAT networking...
[default] Clearing any previously set forwarded ports...
[default] Forwarding ports...
[default] -- ssh: 22 => 2222 (adapter 1)
[default] -- web: 80 => 8080 (adapter 1)
[default] Creating shared folders metadata...
[default] Running any VM customizations...
[default] Booting VM...
[default] Waiting for VM to boot. This can take a few minutes.
[default] Failed to connect to VM!
Failed to connect to VM via SSH. Please verify the VM successfully booted
by looking at the VirtualBox GUI.
由最後發現啟動lucid32已成功,但SSH連線失敗,對照本文一開始的左圖(vagrantTest_1319904659, Ubuntu)
接著使用vagrant ssh 命令查看相訊息。
C:\Documents and Settings\vagrant\SRC\vagrantTest>vagrant ssh
`vagrant ssh` isn't available on the Windows platform. The
vagrant.ppk file for use with Putty is available at:
  C:/jruby-1.6.5/lib/ruby/gems/1.8/gems/vagrant-0.8.7/keys/vagrant.ppk
To use this create a new Putty session for `vagrant@localhost`
on port `2222`, in the Connection>SSH>Auth
configuration section navigate to the vagrant.ppk file,
select it, save the session for later use, and connect.
For a more detailed guide please consult:
  http://vagrantup.com/docs/getting-started/setup/windows.html
(註:在Mac OS X 中,因terminal環境有ssh 指令,所以可直接啟動ssh連線至虛擬機器)

使用PuTTY 


啟動PuTTY
(筆者愛用Pietty,由PuTTY改版以支援中文)

Auto-login username
在Connection->Data中,Auto-login username一欄,輸入使用者名稱 vagrant,如下:
image

輸入私密金鑰
在Connection->SSH->Auth中,Private key file for authentication一欄,輸入私密金鑰ppk所在路徑及檔名,如下:
C:\jruby-1.6.5\lib\ruby\gems\1.8\gems\vagrant-0.8.7\keys\vagrant.ppk
image

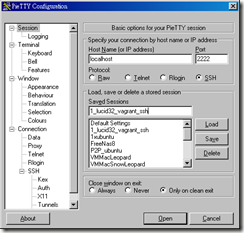
主機名稱及Port
使用主機名稱localhost 及port 2222 來連接,卻無法使用ssh 來連接 lucid32,有未知的問題存在,網上此問題討論
image
筆者使用另一個朋友所製作gold.box, 使用主機名稱localhost 及port 2200 來連接成功,如下圖:
image image
如欲按儲存以保留設定,輸入 Saved sessions 名稱: <自訂名>。

結論
就筆者使用vagrant在windows來說,設定環境很多小問題,需要花時間去調整。整體而言,在Mac OS X 環境,設定vagrant就比windows 容易許多。
記得使用完要關機,在啟動目錄中,輸入vagrant halt,便會關閉虛擬機。一點小經驗,望有所助益。
如有網友成功直接在cygwin 中成功設定vagrant 環境,請不吝分享。

附註
  • 請先行安裝VirtualBox
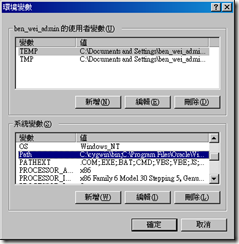
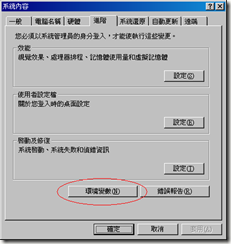
  • 為求方便使用,可將jruby安裝路徑(如:C:\jruby-1.6.5\bin)加入系統環境變數
  • 請確定有將C:\Program Files\Oracle\VirtualBox 路徑加入至系統環境變數中。(與cygwin 環境整合使用)
  • 若有使用Python,也可將環境變數加入,以便在Windows命令提示字元終端中使用。
setup_globalvarsetup_globalvar_selectpathsetup_globalvar_edit  


  • 成功關閉gold vm 的訊息


C:\Documents and Settings\vagrant\SRC\gold>vagrant halt
[default] Attempting graceful shutdown of linux...

C:\Documents and Settings\vagrant\SRC\gold>

2011年10月14日 星期五

在Mac OS X初次使用Arduino實驗板

今天在HackingThursday 聚會,朋友借了一塊Arduino Mega 2560實驗板,現場測試。本文便是將開發設定相關心得做個紀錄。
當然可參考原文的說明手冊
首先至http://arduino.cc/en/Main/Software此下載Mac OS X安裝檔http://arduino.googlecode.com/files/arduino-0022.dmg
arduino_install1
開啟dmg檔案後,便會出現上列,將Arduino 圖示,拖曳到Applications(應用程式目錄),再安裝USB 序列埠驅動程式,如下,依指示安裝。
  arduino_Install_FTD_Driver
先使用USB連接線,連接Mac及2560實驗板,會出現偵測到新網路介面,按cancel 取消即可,不需進行此項設定。
IMG_1442Arduino Mega 2560 Modem in usb detected
再來到Applications 目錄中,找到並執行Arduino整合開發應用程式。
Arduino_in_Applications_dir
Arduino 整合開發環境是以Java開發而成,加上AVR gcc/g++ …的跨平台編譯器及相關設定所組成。
在Arduino設定,注意事項中,先由選單,選擇[Tools] –> [Board] –> [Arduino Mega 2560] (請依網友們的開發板型號,挑選)
arduino_select_hardware
緊接著設定USB 序列埠,先由選單,選擇[Tools] –>[Serial Port]->[/dev/tty.usbmodemfd121] (請依網友們的開發板型號,挑選)
 Arduino_select_the_serial_port
好戲上場,在Arduino中,已準備許多範例程式可供參考,選取視窗上方按鈕[Open]->[1.Basics]->[Blink],
 Arduino_selected_1.Basics_Blink.sample
即出現下方畫面,中央為範例程式碼。最後執行[Upload]鈕(右方數來第二按鈕),立刻編譯並上傳到開發板。(在傳送過程式中,TX燈會閃爍,完成後,即啟動閃爍程式,令13腳位LED每隔一秒閃爍一次。
arduino_Blink_LED_Uploading
若無其他3.3V LED可連13及GND腳位時,可參考下圖,USB Port右方,紅色燈號亦作用與在13pin插LED相同。
 IMG_1445 IMG_1448
結論
Arduino設計非常易於使用,並且有相當多的相容擴充元件可供使用,很適合不太熟悉程式設計及硬體的人來使用。

2011年10月1日 星期六

ARM Linux 開發環境設定指南

debian-arm-booting 
最近在工作上,需要用到ARM相關平台,所以花時間研究 ARM CPU 架構的開發環境,
其中硬體商(目前開發板:Friendly ARM Tiny6410)提供的部分程式必須在Windows 上才可執行。
故筆者想能不能在windows 及ubuntu-linux 中,也可各有一個模擬arm 的開發平台,可直接編譯程式而不需要使用cross-compiler(簡言之,如在windows平台上,使用ARM虛擬機器編譯arm執行檔)。
經過搜尋網上資料後,發現有一套件debian armel可供使用,且很貼心的提供可利用qemu arm來直接載入使用,大大減少重新編譯的時間。

設定步驟


安裝QEMU
下載debian-armel
檔案所在位置:http://people.debian.org/~aurel32/qemu/armel/
 a3853606c5762d41bb245aaeb8823996  debian_lenny_armel_desktop.qcow2
  dce9f0d2855d57b79b63bcf3a9ecd51d  debian_lenny_armel_standard.qcow2
  a6d0dde54fb27254e2b8d94736889462  initrd.img-2.6.26-2-versatile
  1969e2a0ffc571ccf6024dc7c842d4dd  vmlinuz-2.6.26-2-versatile
  c5f9039b463e07852055071ac118320a  debian_squeeze_armel_desktop.qcow2
  b7807306c4c79aaa9a423119f4633ffb  debian_squeeze_armel_standard.qcow2
  f73e83b8e48bd422457dafeb8afe7fc6  initrd.img-2.6.32-5-versatile
  8b33324f99d13dc71d6ad060db2fd60a  vmlinuz-2.6.32-5-versatile

筆者所使用的檔案組合如下表:
下載檔案說明
initrd.img-2.6.32-5-versatile初始化並啟動附加檔案
vmlinuz-2.6.32-5-versatile系統啟動用linux 核心
debian_squeeze_armel_standard.qcowdebian squeeze 標準系統映像檔(可寫入更新資料)


執行debian arm linux
開機完成後,預設登入帳號及密碼皆為root。
debian-arm-login

執行腳本檔
此腳本用來執行debian-armel,及相關必要參數。
run.sh
#!/bin/sh
export PATH="$PATH:/usr/local/qemu/bin"
PLATFORM="`uname -s | cut -d'_' -f1`"
QEMUEXE="qemu-system-arm"
if [ "$PLATFORM" = "CYGWIN" ] ; then
    QEMUEXE=${QEMUEXE}.exe
fi
img=debian_squeeze_armel_standard.qcow2
$QEMUEXE -M versatilepb  -kernel vmlinuz-versatile -initrd initrd.gz -m 256 -hda $img -append 'root=/dev/sda1' -redir tcp:2200::22

使用腳本檔案前用先將,下列檔案更名:

  • initrd.img-2.6.32-5-versatile  改為 initrd.gz
  • vmlinuz-2.6.32-5-versatile 改為 vmlinuz-versatile

進入到run.sh 所在目錄,並執行下列腳本檔

sh run.sh

註一:當在使用apt-get install gcc g++ 時,發生找不到檔案的情形。
解決方法: apt-get update –fix-missing
註二:因為qemu 網路架構原設計,需使用-redir 參數用來將Guest OS(debian-arm) 的ssh 22 port 轉到本機2200port。(記得debian-arm中,執行 apt-get install openssh-server來安裝ssh server)

結論
當筆者完成所有步驟後,等於擁有一台虛擬ARM機器,且為一包含完整開發軟體的LINUX系統。
若網友們所寫的程式無特別額外ARM硬體需求,則可直接在上面開發偵錯,可減少arm程式複製到arm 板子上的時間。